Welcome!

With washing waiting to be folded and cereal in our hair we share our roller coaster lives to inspire, relate and communicate with Mums just like us.

All things family related food, recipes, reviews, gardening, crafts, educational play, home things, outings and more.

Hi! We're in the process of moving over to our new site. You can find our content here for now or check out the old and the brand NEW at www.mumstakefive.com


Tuesday, October 29, 2013

Terrarium in a Tank - Make your own little garden


One of the things I love to do most is gardening - on a small scale. It’s something that I've become used to with all the moving and living in rental properties. 
After making this I think I am hooked, 

I've already started planning my next beach themed terrarium!

We have had our little fish tank for years and years. It’s been home to hermit crabs, tropical fish and now….. plants! It’s travelled from Darwin to Brisbane to Sydney and has done us well. It only cost $30 when we bought it but recently one of the top glass covers broke making it unsafe and pretty much useless for any pets. 
So if you have an old fish tank, vase or glass jar you’re not using then give this ago and make it useful again. It doesn't cost much, it looks great and there’s very little maintenance to keep it going.


Terrarium in a Tank -  A little Garden in a Fish Tank


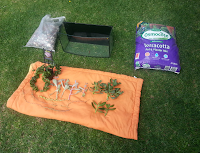
You’ll need:
A Tank or container of your choice 

Rocks or similar (pebbles, seashells, glass stones)

Moss (sphagnum moss is best)

Potting mix

Plant cuttings or buy some small plants

*I used cuttings from my succulents; these are my favourite plant to cut. The original plant just keeps growing and putting out new shoots and the cuttings start growing roots immediately. They’re hardy and they are cheap to buy.

*Charcoal - if you’re keeping it indoors or putting a lid on


How to create:
1. Clean your container so there’s no bacteria or dirty marks.

2. Place your rocks in gently to make the bottom level, this is for drainage and prevents root rot.

3. * If your terrarium is going to be living indoors or has a lid - Add a layer of charcoal. 
This will prevent the soil from becoming smelly. You can buy it from most pet shops for around $5 - $8

4. Cover the charcoal/rocks with a layer of moss. This will keep your levels clear and looking neat by preventing soil from spreading through the rocks. Sphagnum moss is the best. Keep any left over moss for the top. 

5. Add your potting mix.

6. Position your plants/cuttings before you plant them so you know where everything will go and then plant them one by one and compact the soil around them.

7. Give your new terrarium a little drink then place any leftover moss you have in between the plants.


Maintenance:
Lightly water open containers twice a week and closed containers once a fortnight. 
Trim any plants that are growing over the edge or are getting too bushy. 


Have you tried growing new plants from cuttings before?   What plants worked for you?


Its Tuesday so we're linking up "IBOT" with some other great Blogs over at http://essentiallyjess.com/

You may also like our Build your own Dinosaur Garden.  

Tuesday, October 22, 2013

Bow like a pro! - How to make an easy bow for presents


bows ribbons christmas wrapping presents wrapping

There is no need to be exact just cut your strips of paper, 
glue the bows and then stick it all together.  


How many strips you'll need will depend on their width and length.  I have my sizes listed at end of post.  You'll need about 6 - 12 strips. Make the last few a little shorter so they sit better inside.
Fold the strips in half just so you know roughly where the ends need to meet.


Take one end and fold it around and then you'll need to do the same with the other end.


Place a little glue on the back and stick them down. 
Repeat with the other strips.


Then its just a dab of glue and assemble


Give it a bit of tweaking and you're done! Tadah! 


If you use thick paper or card you might need something to hold in place whilst it dries.


If you're making a thinner width bow you'll need more strips


Gigantic ones are way cool


I used floristry ribbon for this one. Ended up securing with a staple through the middle.


For this bow i used 3cm in width strips with :
3 x 32cm length
2 x 27cm length
1 x 20cm length


For this one i used 1cm width strips with :
6 x 26cm lengths
2 x 20cm lengths
2 x 18cm lengths 
1 x 7cm length


You don't have to bee all Hallmark about it just cut and stick and everyone can have pretty bows!


My Little Drummer Boys

Its Wordless Wednesday with http://mylittledrummerboys.blogspot.com.au/


Have a look at this post about Lego Cookies
or this recipe for Blueberry and Custard Loaf


Saturday, October 12, 2013

Zucchini & Ricotta Gnocchi


Zucchini and Ricotta Gnocchi
Its not as hard as it appears really. If you can make a dough you can make Gnocchi. Its just getting the flour mix right not too much it tastes floury, tastes tough or falls apart when cooked or too little it doesn't bind or is too sticky.  You'll be right add a little at a time and it'll be fine.


Ingredients:

4 cups Zucchini, grated
1/4 cup chopped herbs ( I use mostly Basil, Chives and Parsley from my garden but you can use whatever you prefer)
2 teaspoons lemon zest (optional)
500grams Ricotta
2 egg yolks
1/4 cup (parmesan), finely
1 cup flour (about you may need a little more)
2 teaspoon smoked Paprika (Its not hot at all)
Salt

Method:
Grate the Zucchini, Salt it well and then leave to drain in a colander for a good twenty minutes, squeeze out as much liquid as possible. It is important to get all the moisture out so it be thorough.

Mix the Zucchini, Herb, Lemon, Ricotta, Egg, Paprika and Cheese then mix in enough flour to form a dough that is not too sticky to work with. Getting the balance can be tricky just add a bit at a time.
The idea is to use just enough flour so its not sticky but enough so it holds and not too much so it falls apart when cooking.  Its hard to say exactly how much flour because it depends on your ricotta and moisture in your Zucchini but i think i've made it sound very difficult its not you'll be right :)


Take handfuls of the dough and roll into 1 inch thick strings then chop into 1 inch pieces.
I use a mat or chopping board and flour it really lightly just so it doesn't stick to the board. Tyr and use your fingers only to roll it out lightly.  

In a large saucepan of boiling hot water test your Gnocchi to see if it holds when cooked.
Cook the Gnocchi in boiling water until it floats, remove and enjoy in your favourite sauce.


Sauce
Simple is best i think when you have such beautiful flavour Gnocchi.  A plain butter sauce or simple tomato. Whatever you like :)


Decorate your own Trick or Treat bags!


You’ll need:
  • Paper bag/s
  • Orange paint & paint brush
  • Halloween stickers - I found this packet at the two dollar shop, they also sell them at most craft stores.


I squeezed some paint onto one side of the bag and let Miss 2 brush it all around.


She then picked out the stickers she wanted, I helped peel them and passed them to her to position where she liked. 


We left them to dry and that afternoon turned them over and did the same to the other side. 


Once they were dry I wrote ‘Trick OR Treat?’ on the sides.


Now my two little monsters are all ready to go trick or treating on Thursday 31st of October!


Friday, October 4, 2013

Awesome Toilet Roll Monsters!


http://mumstakefive.blogspot.com.au/   Pre-school craft  Halloween


You’ll need:

  • 3 x toilet paper rolls
  • 10 squares of toilet paper
  • 2 x large black pipe cleaners (OR 10 x standard pipe cleaners)
  • 1 x A4 sheet of orange paper
  • 3 x pipe cleaners - for arms
  • Stickers - for the eyes, nose and mouth (OR use googly eyes, paint, texta)
  • Craft glue


Mommy Monster 
Squeeze some craft glue on the roll and wrap all the toilet paper around then glue the fold down.
Twist a pipe cleaner around to create the arms. 
Decorate using stickers,googly eyes, paint or texta.


Pumpkin Monster 
Cut the paper in half, length ways.
Glue the toilet roll and wrap the paper around gluing down as you go. Glue the fold down
Twist a pipe cleaner around to create the arms. Decorate the eyes, nose and mouth using stickers, googly eyes, paint or texta.
*I folded a pipe cleaner to make legs but the legs made it wobbly and I think it looks better without them.


Fuzzy Monster
Twist the two black large pipe cleaner ends together to make one long one. 
Using craft glue or double sided sticky tape, wrap the large pipe cleaner around and around the whole roll.
Twist a pipe cleaner around to create the arms.
Decorate using stickers,googly eyes, paint or texta.


Super easy paper pumpkins!


For each pumpkin you’ll need:
http://mumstakefive.blogspot.com.au/
  • 1 x A4 paper
  • 2 x paper fasteners
  • 1 x green pipe cleaner
  • Pencil - to curl your pipe cleaner and pierce the paper strips
  • Orange crayon - to colour the paper (OR use paint/pencil/texta)
  • 2 x googly eyes (or you can draw them on)
  • Black paper - for the mouth and nose
  • Fishing line or string - to hang


http://mumstakefive.blogspot.com.au/
Cut the paper into 8 even strips. I did this by folding the paper in half and cutting along the fold, repeating this until I had the 8 strips.

Using the tip of the pencil I pierced a small hole at each end of every strip of paper.

Give these strips to your child to colour in orange.

Show them how to poke the paper fastener through the holes, point out that the coloured side needs to be facing down. Open the fastener to secure.


The next bit is a little fiddley so you may need to help out. Bend the strips around and poke them individually through the second paper fastener. Open the fastener to secure.

Using the pencil curl the green pipe cleaner. Twist it once under the top paper fastener.

Tie the fishing line/string where you tied the pipe cleaner.

Sticky tape or glue your googly eyes, nose and mouth on.

Your paper pumpkin is ready to hang anywhere you like.


*Make a few and use A3 paper to make a little paper pumpkin family!


http://mumstakefive.blogspot.com.au/  Mums Take Five